
ASP.NET Web API is a powerful framework that allows developers to build and consume HTTP services. It is a part of the broader ASP.NET framework and is designed to simplify the creation of RESTful APIs. Unlike traditional ASP.NET MVC, which primarily focuses on serving HTML pages, Web API is dedicated to handling HTTP requests and responses, making it a versatile choice for building web services.
Key aspects include:
- HTTP-Centric Approach: Web API revolves around the HTTP protocol, providing a platform-agnostic solution for creating versatile web services.
- RESTful Principles: Embracing RESTful principles, Web API encourages the use of standard HTTP methods (GET, POST, PUT, DELETE), fostering a resource-centric approach.
- Data Format Agnosticism: Web API is flexible in terms of data formats, supporting popular choices like JSON and XML, catering to diverse client needs.
In ASP.NET Web API plays an important role in facilitating Ideal communication between various components of a web application. Its importance can be attributed to several key factors that address the challenges and demands of contemporary development practices.
- Microservices Architecture: Web API aligns seamlessly with microservices architecture, enabling the creation of independent and scalable components that can be easily integrated.
- Cross-Platform Compatibility: With support for various data formats and HTTP methods, Web API ensures compatibility across different platforms, allowing for efficient communication between diverse systems.
- Client-Side Framework Integration: Web API can be effortlessly integrated with popular client-side frameworks, enabling the development of interactive and dynamic single-page applications (SPAs).
ASP.NET Web API comes with features that empower developers to create better, scalable, and maintainable web services. Notable aspects include:
- Attribute-Based Routing: Simplifies routing through attribute-based routing, offering a declarative way to define routes directly on controllers and actions.
- Content Negotiation Support: The framework supports content negotiation, allowing clients to request data in various formats, fostering flexibility in data exchange.
- Built-in Security Measures: Web API includes built-in support for implementing security measures, encompassing authentication and authorization to protect sensitive data.
- Installation and Setup
- Creating a New Web API Project
- Understanding the Project Structure
- What are Controllers in ASP.NET Web API?
- Parameter Binding and Model Binding
- Routing in ASP.NET Web API
- Working with Data in ASP.NET Web API
- Content Negotiation and Media Types in ASP.NET Web API
- Authentication and Authorization in ASP.NET Web API
Installation and Setup
Before embarking on your ASP.NET Web API journey, it’s crucial to ensure a smooth setup process. Follow these steps to seamlessly install and set up your development environment:
- Install Visual Studio: Ensure you have Visual Studio installed on your machine. You can download the latest version from the official website.
- Select Workloads: During installation, select the appropriate workloads for web development, ensuring that ASP.NET and web development components are included.
- Install ASP.NET Web API: Once Visual Studio is installed, you can add ASP.NET Web API to your development environment using the Visual Studio Installer.
- Verify Installation: After installation, verify that the ASP.NET Web API tools are successfully integrated into Visual Studio.
Creating a New Web API Project
With your development environment set up, creating a new Web API project is the next logical step. Follow these straightforward steps to initiate your project:

- Select Web API Project Template: In the project template selection, choose the “ASP.NET Core Web Application” template. Then, select the “API” template to create a new Web API project.
- Configure Project Settings: Define your project’s name, location, and solution settings. Ensure that you choose the appropriate .NET Core version based on your requirements.
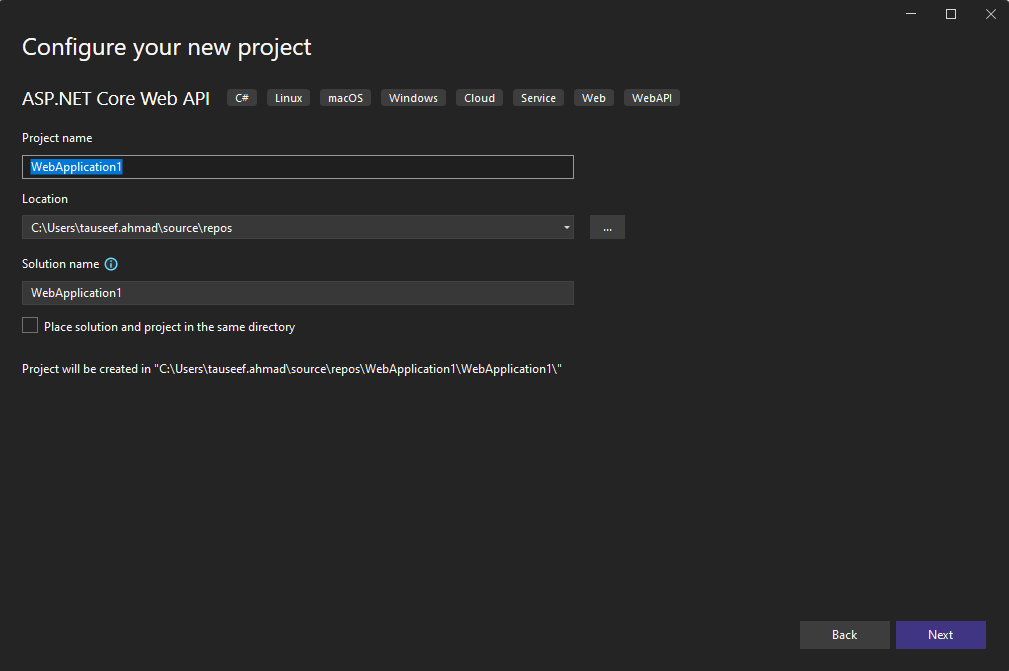
- Create Project: Click “Create” to generate your new Web API project with the selected settings.
Understanding the Project Structure
As you check into your newly created Web API project, understanding its structure is vital for efficient development. The project structure typically includes:
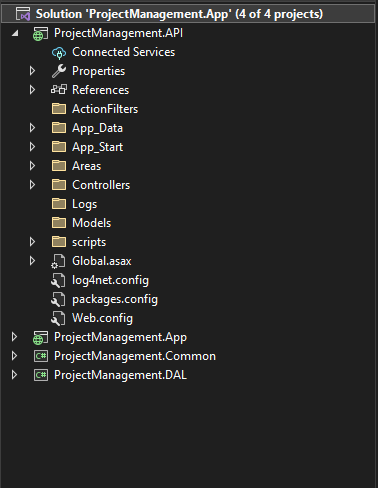
- Controllers Folder: This directory is dedicated to housing Web API controllers. Controllers play an important role in defining actions that handle incoming HTTP requests. Each controller is responsible for managing specific resources or functionalities within the API.
- Models Folder: The Models folder contains data models used by your API. These models serve as representations of entities and data structures. By defining clear and well-structured models, you establish a robust foundation for handling and managing data within your Web API.
- Startup.cs: The Startup.cs file is a critical component that holds the configuration for your application. Here, you set up services and middleware, defining how the application should behave and respond to various events during its lifecycle. Configuring services and middleware in the Startup.cs file is fundamental to tailoring the behavior of your Web API.
- appsettings.json: Configuration settings for your application are stored in the appsettings.json file. This includes environment-specific details, logging configurations, and other settings such as allowed hosts. Keeping configuration separate from code allows for easier maintenance and adaptability in different deployment environments.
- wwwroot Folder: If included, the wwwroot folder serves as a repository for static files like HTML, CSS, and JavaScript. These files are typically used for client-side functionalities, enhancing the user interface and experience of your Web API.
- web.config: In certain deployment scenarios, the web.config file is employed to configure settings for Internet Information Services (IIS) and ASP.NET. It provides a way to control various aspects of the hosting environment, such as authentication, authorization, and custom error handling.
What are Controllers in ASP.NET Web API?
Web API controllers act as the intermediaries between the client and server, facilitating communication by defining actions that respond to specific HTTP requests. These controllers encapsulate the logic for processing requests and generating responses, making them integral to the functionality of your Web API.
Controllers typically define the endpoints (URL routes) of an API, along with the associated actions that execute business logic and interact with data sources.
Creating Controllers and Actions
To create a controller in ASP.NET Web API, follow these steps:
- Define a Controller Class: Create a new class that inherits from the
ApiControllerbase class.
// Example: ValuesController.cs
public class ValuesController : ApiController
{
    // Actions will be defined here...
}
- Define Actions: Within the controller class, define methods (actions) corresponding to different HTTP methods and resource operations.
// Example: ValuesController.cs
public class ValuesController : ApiController
{
    // GET api/values
    public IEnumerable<string> Get()
    {
        // Logic to retrieve data...
    }

    // POST api/values
    public IHttpActionResult Post([FromBody] string value)
    {
        // Logic to create a new resource...
    }
}
Handling HTTP Methods (GET, POST, PUT, DELETE)
Web API controllers handle various HTTP methods to perform different operations on resources. Here’s how to handle common HTTP methods:
- GET: Used to retrieve data from the server.
- POST: Used to create new resources on the server.
- PUT: Used to update existing resources on the server.
- DELETE: Used to delete resources from the server.
// GET api/values
[HttpGet]
public IEnumerable<string> Get()
{
    // Logic to retrieve data...
}

// POST api/values
[HttpPost]
public IHttpActionResult Post([FromBody] string value)
{
    // Logic to create a new resource...
}

// PUT api/values/5
[HttpPut]
public IHttpActionResult Put(int id, [FromBody] string value)
{
    // Logic to update an existing resource...
}

// DELETE api/values/5
[HttpDelete]
public IHttpActionResult Delete(int id)
{
    // Logic to delete an existing resource...
}
In this example, each method within the Web API controller is decorated with a specific HTTP method attribute:
[HttpGet]: Indicates that theGetmethod should handle HTTP GET requests.[HttpPost]: Indicates that thePostmethod should handle HTTP POST requests.[HttpPut]: Indicates that thePutmethod should handle HTTP PUT requests.[HttpDelete]: Indicates that theDeletemethod should handle HTTP DELETE requests.
Each action method in a controller corresponds to one of these HTTP methods and defines the logic for processing requests.
Parameter Binding and Model Binding
ASP.NET Web API provides powerful mechanisms for parameter binding and model binding, allowing controller actions to receive input data from various sources such as URI, query string, request body, or form data. Parameter binding and model binding are essential for extracting data from incoming requests and mapping it to method parameters or model objects.
Parameter Binding
Parameter binding refers to the process of mapping data from request parameters to method parameters in controller actions.
Here’s an example demonstrating parameter binding using route parameters and query string parameters:
// GET api/values/{id}
[HttpGet("{id}")]
public IActionResult GetById(int id)
{
    // Logic to retrieve data by ID...
}

// GET api/values
[HttpGet]
public IActionResult GetByCategory([FromQuery] string category)
{
    // Logic to retrieve data by category...
}
In this example:
- The
GetByIdmethod uses route parameter binding to retrieve data based on the ID specified in the URL (api/values/{id}). - The
GetByCategorymethod uses query string parameter binding to retrieve data based on the category specified in the query string (api/values?category={category}). The[FromQuery]attribute indicates that thecategoryparameter should be bound from the query string.
Model Binding
Model binding refers to the process of mapping data from the request body to model objects.
Here’s an example demonstrating model binding using a model class:
public class Product
{
    public int Id { get; set; }
    public string Name { get; set; }
    public decimal Price { get; set; }
}

// POST api/products
[HttpPost]
public IActionResult CreateProduct([FromBody] Product product)
{
    // Logic to create a new product...
}
In this example:
- The
CreateProductmethod accepts aProductobject as a parameter, which is bound from the request body using the[FromBody]attribute. When a POST request is made toapi/productswith JSON representing aProductobject in the request body, ASP.NET Web API automatically binds the JSON data to theproductparameter.
Routing in ASP.NET Web API
Routing in ASP.NET Web API defines the mapping between incoming HTTP requests and the corresponding controller actions. It allows you to define URL patterns and route templates that are used to determine which controller and action should handle a specific request. By defining routes, you can create a logical structure for your API endpoints and provide meaningful URLs for client applications to interact with.
Configuring Routes in Web API
Configuring routes in Web API involves defining route templates and registering them with the routing system. Routes can be configured using convention-based routing or attribute-based routing. Convention-based routing is configured globally in the application’s route table, while attribute-based routing allows you to define routes directly on controller actions using attributes.
Example of Convention-Based Routing:
public static class WebApiConfig
{
    public static void Register(HttpConfiguration config)
    {
        // Define a default route
        config.Routes.MapHttpRoute(
            name: "DefaultApi",
            routeTemplate: "api/{controller}/{id}",
            defaults: new { id = RouteParameter.Optional }
        );
    }
}
In this example, a default route is defined using the MapHttpRoute method, which maps incoming requests to controller actions based on the controller name and optional id parameter.
Attribute-Based Routing
Attribute-based routing in ASP.NET Web API allows you to define routes directly on controller actions using attributes like [Route]. This approach provides more flexibility and control over routing compared to convention-based routing. With attribute-based routing, you can define routes that are specific to individual actions, allowing for finer-grained control over the API’s URL structure.
Example of Attribute-Based Routing:
public class ProductsController : ApiController
{
    // GET api/products
    [HttpGet]
    [Route("api/products")]
    public IHttpActionResult GetAllProducts()
    {
        // Logic to retrieve all products...
    }

    // GET api/products/{id}
    [HttpGet]
    [Route("api/products/{id}")]
    public IHttpActionResult GetProductById(int id)
    {
        // Logic to retrieve product by ID...
    }
}
In this example, attribute-based routing is used to define routes directly on the ProductsController actions. The [Route] attribute specifies the URL pattern for each action, allowing for more precise control over the API’s routing behavior.
Working with Data in ASP.NET Web API
Working with data is a fundamental aspect of building better and functional ASP.NET Web API applications. Let’s explore the essential components of working with data, including connecting to databases, integrating Entity Framework, performing CRUD operations, and implementing data validation and error handling mechanisms:
Connecting to Databases
Connecting to databases allows your ASP.NET Web API application to interact with persistent data storage. You can establish connections to various database systems such as SQL Server, MySQL, PostgreSQL, or NoSQL databases like MongoDB. Connection strings containing the necessary information (server, database name, credentials) are used to establish connections.
Example Connection String for SQL Server:
string connectionString = "Server=myServerAddress;Database=myDatabase;User Id=myUsername;Password=myPassword;";
Entity Framework Integration
Entity Framework (EF) is a popular Object-Relational Mapping (ORM) framework for .NET applications. It simplifies data access by allowing developers to work with database entities using familiar object-oriented concepts. Integration with Entity Framework involves configuring EF within your Web API application and defining entity models that represent database tables.
Example Entity Model:
public class Product
{
    public int Id { get; set; }
    public string Name { get; set; }
    public decimal Price { get; set; }
}
Performing CRUD Operations in Web API
CRUD (Create, Read, Update, Delete) operations are fundamental data manipulation tasks performed on databases. In the context of ASP.NET Web API, CRUD operations involve:
- Create: Adding new records to the database.
- Read: Retrieving data from the database.
- Update: Modifying existing records in the database.
- Delete: Removing records from the database.
These operations are typically implemented as controller actions that correspond to specific HTTP methods (POST, GET, PUT, DELETE).
Example CRUD Operations Controller:
public class ProductsController : ApiController
{
    private readonly MyDbContext _context;

    public ProductsController(MyDbContext context)
    {
        _context = context;
    }

    // POST api/products
    [HttpPost]
    public async Task<IActionResult> CreateProduct(Product product)
    {
        _context.Products.Add(product);
        await _context.SaveChangesAsync();
        return Ok(product);
    }

    // GET api/products/{id}
    [HttpGet("{id}")]
    public async Task<IActionResult> GetProductById(int id)
    {
        var product = await _context.Products.FindAsync(id);
        if (product == null)
        {
            return NotFound();
        }
        return Ok(product);
    }

    // PUT api/products/{id}
    [HttpPut("{id}")]
    public async Task<IActionResult> UpdateProduct(int id, Product product)
    {
        if (id != product.Id)
        {
            return BadRequest();
        }

        _context.Entry(product).State = EntityState.Modified;

        try
        {
            await _context.SaveChangesAsync();
        }
        catch (DbUpdateConcurrencyException)
        {
            if (!ProductExists(id))
            {
                return NotFound();
            }
            else
            {
                throw;
            }
        }

        return NoContent();
    }

    // DELETE api/products/{id}
    [HttpDelete("{id}")]
    public async Task<IActionResult> DeleteProduct(int id)
    {
        var product = await _context.Products.FindAsync(id);
        if (product == null)
        {
            return NotFound();
        }

        _context.Products.Remove(product);
        await _context.SaveChangesAsync();

        return NoContent();
    }

    private bool ProductExists(int id)
    {
        return _context.Products.Any(e => e.Id == id);
    }
}
Content Negotiation and Media Types in ASP.NET Web API
Content negotiation is the process by which a client and server agree on the most suitable representation of a resource based on factors such as the client’s preferences, capabilities, and the server’s capabilities.
It enables clients to request data in various formats (such as JSON, XML, or others) and allows servers to respond with the most appropriate representation based on the requested media type.
Supported Media Types
Media types specify the format of the data exchanged between clients and servers. ASP.NET Web API supports a variety of media types, including JSON (application/json), XML (application/xml), and others. Media types are specified using MIME (Multipurpose Internet Mail Extensions) types and subtypes, allowing clients and servers to understand each other’s capabilities and preferences.
Implementing Content Negotiation in Web API
In ASP.NET Web API, content negotiation is implemented using the NegotiatedContentResult<T> class, which allows controllers to return content negotiated results based on the requested media type. Content negotiation can be performed automatically by Web API based on the Accept header in the HTTP request, or it can be explicitly specified using attributes like [Produces].
Example of Content Negotiation with Automatic Handling:
public IHttpActionResult GetProduct()
{
    Product product = // Retrieve product from data source

    if (product == null)
    {
        return NotFound();
    }

    return Ok(product); // Automatically negotiated based on client's Accept header
}
Example of Content Negotiation with Explicit Handling:
[HttpGet]
[Produces("application/json", "application/xml")]
public IHttpActionResult GetProduct()
{
    Product product = // Retrieve product from data source

    if (product == null)
    {
        return NotFound();
    }

    return Ok(product); // Negotiated based on specified media types
}
In these examples, the controller action returns a product object, and content negotiation is performed either automatically or explicitly based on the requested media types (application/json or application/xml). ASP.NET Web API handles content negotiation seamlessly, ensuring that clients receive data in the most suitable format based on their preferences and the server’s capabilities.
Authentication and Authorization in ASP.NET Web API
Authentication and authorization are critical aspects of securing ASP.NET Web API endpoints, ensuring that only authenticated and authorized users can access protected resources. Let’s explore how to secure Web API endpoints, implement authentication using OAuth and JWT, and enforce role-based authorization:
Securing Web API Endpoints
Securing Web API endpoints involves protecting resources from unauthorized access by requiring clients to authenticate themselves before accessing sensitive data or performing privileged operations. This can be achieved by implementing authentication mechanisms such as OAuth, JWT (JSON Web Tokens), or other authentication protocols.
Implementing Authentication with OAuth and JWT
OAuth (Open Authorization) and JWT (JSON Web Tokens) are commonly used authentication mechanisms in ASP.NET Web API applications. OAuth allows clients to obtain access tokens to access protected resources on behalf of a user, while JWT provides a compact and self-contained way to transmit authentication information between parties as a JSON object.
Example of Implementing Authentication with OAuth and JWT:
public class OAuthController : ApiController
{
    [HttpPost]
    public IHttpActionResult Authenticate(LoginModel model)
    {
        // Validate user credentials
        if (!IsValidUser(model.Username, model.Password))
        {
            return Unauthorized();
        }

        // Generate JWT token
        var token = GenerateJwtToken(model.Username);

        // Return token to the client
        return Ok(new { Token = token });
    }

    private bool IsValidUser(string username, string password)
    {
        // Validate user credentials against database or other authentication source
        // Return true if valid, false otherwise
    }

    private string GenerateJwtToken(string username)
    {
        // Generate JWT token with username and expiration date
        // Return the token as a string
    }
}
Role-Based Authorization
Role-based authorization allows you to restrict access to certain resources based on the roles assigned to users. In ASP.NET Web API, role-based authorization can be implemented using attributes like [Authorize(Roles = "Admin")], which restrict access to actions or controllers to users who belong to specific roles.
Example of Role-Based Authorization:
[Authorize(Roles = "Admin")]
public class AdminController : ApiController
{
    [HttpGet]
    public IHttpActionResult GetAdminData()
    {
        // Return sensitive data accessible only to admin users
    }
}
In this example, the AdminController is decorated with the [Authorize(Roles = "Admin")] attribute, ensuring that only users who belong to the “Admin” role can access the GetAdminData action.
We provide insightful content and resources to empower developers on their coding journey. If you found this content helpful, be sure to explore more of our materials for in-depth insights into various Programming Concepts.
Stay tuned for future articles and tutorials that illustrate complex topics, helping you become a more proficient and confident developer.